LiteTracker: How to Use Epics to Organize Large Features
LiteTracker helps teams turn sprawling initiatives into manageable work by grouping related stories into epics. This guide walks through using epics to track large-scale features, pick which stories belong together, and estimate completion so your team can deliver confidently with LiteTracker.
Step 1: Understand what an epic is
An epic is a large story that represents a feature or collection of work that will be delivered together. Think of epics as labels you can promote into first-class planning objects. Epics let you track progress at a higher level while still keeping individual stories visible and actionable.
Use epics when you need to:
- Group related stories that combine to deliver a feature.
- Track progress across multiple stories without losing story-level detail.
- Pick and choose which stories are part of the feature rather than applying a release to everything above it.
Step 2: View epics and read their progress bars
Open the epics area from the sidebar to see all active epics and their status at a glance. Each epic shows a color coded progress bar that summarizes story states and points. Hovering over the bar reveals details: green for accepted, yellow for in progress, gray for prioritized, and blue for icebox.
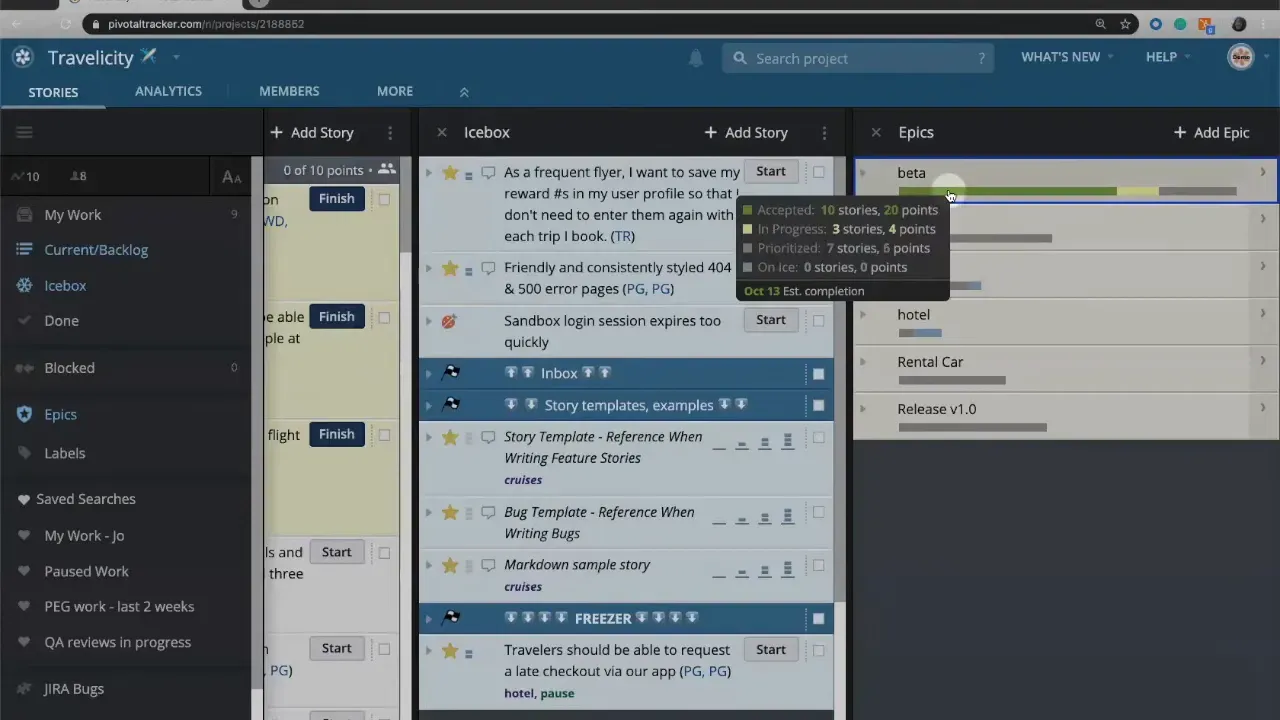
Hover to inspect the breakdown. For example, you might see "10 stories accepted worth 20 points" and "3 stories in progress worth 4 points." LiteTracker uses only planned work to estimate a completion date, so prioritized and in progress stories drive the projected finish. Icebox stories are excluded from that estimate unless you plan them.

Step 3: Create a new epic
Click the Add Epic button at the top of the epics view to create a new epic. Give it a clear, actionable name that communicates the outcome, such as Adventure Travel or User Profile. Add a concise description that captures scope, key constraints, and desired user value.
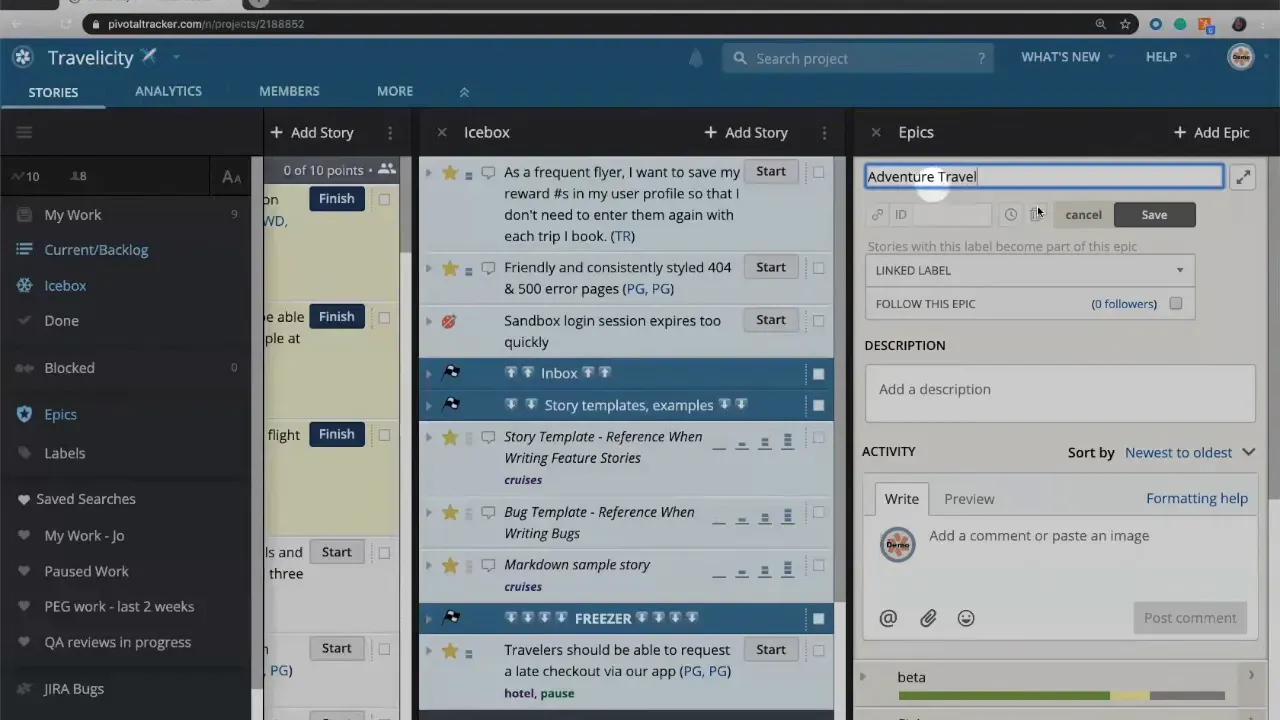
Keep the description focused. Treat it as a shared understanding of what completing this epic will enable. Use the activity feed within the epic to record decisions, discussions, and changes so the epic remains the single source of truth for that feature.
Step 4: Add stories to the epic
You can add stories to an epic in several ways:
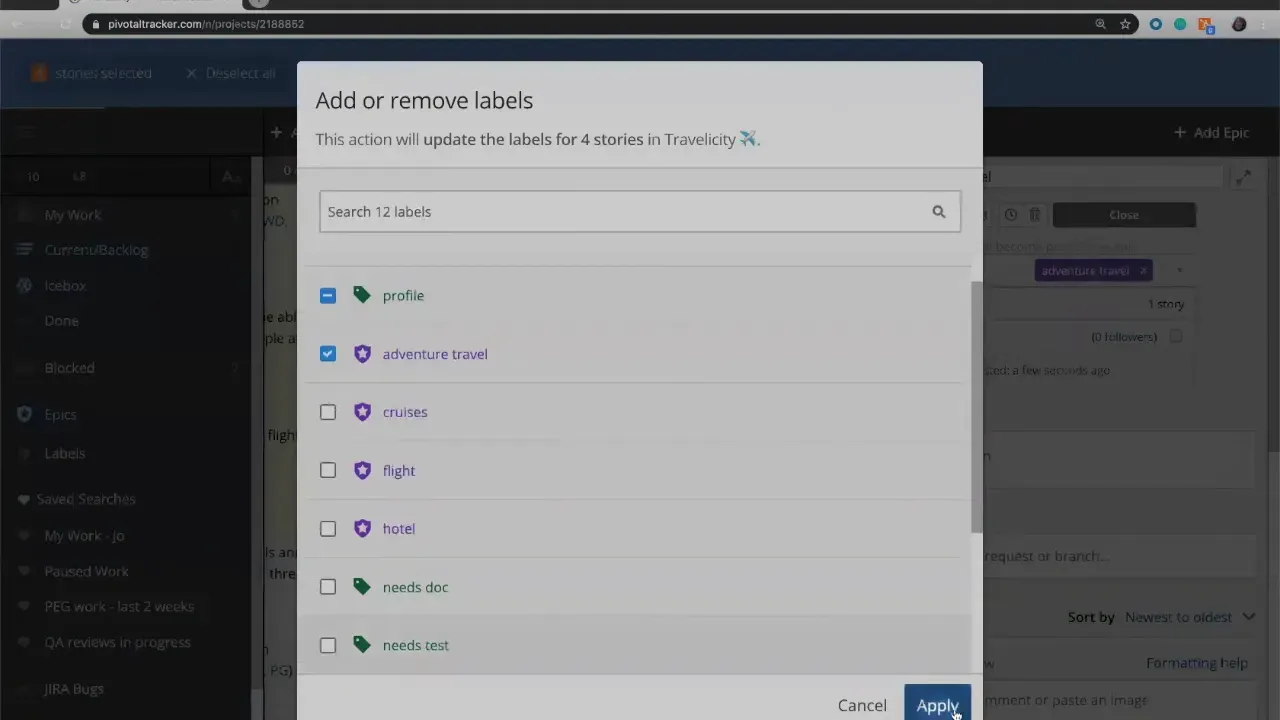
- Drag and drop individual stories into the epic from the backlog or icebox.
- Bulk select multiple stories from any list, then apply the epic label to add them all at once.
Stories can live anywhere in the backlog or icebox when you attach them to an epic. After adding stories, the epic progress bar updates to reflect accepted, in progress, prioritized, and icebox counts and points. This lets you track the epic health visually and numerically without losing sight of story-level details.
Step 5: Promote a label to an epic
If a set of stories already shares a label that should become an epic, promote the label instead of recreating work. Open the label settings, click the gear, and convert that label into an epic. The promotion preserves the link between the stories and the new epic, giving you a fast way to elevate work into long-term planning in LiteTracker.
Promotion is helpful when discovery starts as loosely labeled ideas and evolves into a feature that needs dedicated tracking. The conversion avoids duplicating effort while enabling richer epic-level metadata and tracking.
Step 6: Prioritize epics and manage estimates
Epics are stack rankable just like stories. Drag epics into priority order to reflect organizational goals or release timing. LiteTracker combines planned story work to estimate an epic completion date. Remember these key estimation rules:
- Only planned stories (prioritized and in progress) are included in the estimate.
- Icebox stories are excluded until you move them into planned work.
- If you expect to include icebox work, add buffer time or move those stories into prioritized status to get an accurate finish date.
Keep the epic prioritized and groomed. Revisit included stories, update estimates, and accept completed stories so the progress bar and estimate remain reliable.
Step 7: Use epics as collaboration anchors
Treat the epic description and activity feed as the central place for decisions and context. Document acceptance criteria, dependencies, and cross-team contacts. When new stakeholders ask "what's included," point them to the epic rather than scattering answers across stories.
When multiple teams or tracks work in parallel, epics give a way to coordinate: they let you pick and choose which stories belong to which feature without forcing a release story to blanket everything above it. This flexibility is especially useful in complex roadmaps managed in LiteTracker.
Step 8: Best practices checklist
- Give epics descriptive names that reflect outcomes, not implementation.
- Use the description to nail down scope and acceptance criteria.
- Keep icebox stories out of estimates unless you plan to schedule them.
- Promote labels when discovery coalesces into a feature to avoid duplication.
- Re-rank epics regularly so priority reflects business needs.
How do epics differ from labels and release stories?
Epics are like promoted labels with additional planning capabilities. Labels can tag stories informally; promoting a label converts it into an epic so you can track progress, add descriptions, and use an epic-level activity feed. Release stories apply to every story above them on the board, while epics let you explicitly select which stories belong.
Will icebox stories affect an epic's estimated completion date?
Not by default. LiteTracker calculates epic estimates using planned work only: in progress and prioritized stories. Icebox items are excluded from the projection. If you plan to include icebox work, move those stories into prioritized status or add buffer time to the estimate.
Can I add stories from different backlogs to a single epic?
Yes. Stories can be selected from anywhere in the backlog or icebox and added to an epic in bulk or individually. This makes it easy to assemble a cross-track feature without moving stories out of their current backlog location.
How should I name and scope epics for clarity?
Name epics for the outcome they enable rather than the implementation. Use the description to define scope, key acceptance criteria, and any dependencies. This helps stakeholders and new team members understand what "done" looks like at the epic level in LiteTracker.
What visual cues indicate epic health?
The epic progress bar is color coded: green for accepted, yellow for in progress, gray for prioritized, and blue for icebox. Hovering over the bar shows counts and points by status. Use those cues to quickly assess whether an epic is progressing or congested with unplanned work.
LiteTracker makes it simple to group, prioritize, and estimate large pieces of work so teams can focus on delivering outcomes rather than tracking status manually.
Appendix: Epic template and checklist
Use this short template to create clear, consistent epics that are easy to understand and track.
- Name: outcome-focused title (1–4 words)
- Description: concise scope, user value, and constraints
- Acceptance criteria: clear conditions for “done”
- Dependencies: teams, APIs, and cross-track work
- Stakeholders: primary contacts and owners
- Initial stories: list of prioritized and in-progress stories
- Estimate buffer: note if icebox work might be included
Example epic description
Enable users to create and customize profiles so they can share preferences and contact info. Scope includes profile creation, avatar upload, and privacy settings. Acceptance: user can create a profile, edit fields, and set visibility. Dependencies: authentication service and storage API. Owner: Product Manager.
Quick grooming checklist
- Confirm outcome-focused name
- Verify stories reflect the scope and are estimated
- Exclude icebox stories from the estimate or add buffer
- Document key decisions in the epic activity feed
- Re-rank the epic to reflect current priorities
Credits: This tutorial is created based on this original video Understanding how to use Epics